Edit menu items
Lets start editing our views to make our app to look more professional and easier to use. First thing to note is that we would like to go to Todo folder many times, so it is reasonable to add Todo folder to our header menu. In order to change menu, lets open file _Layouts.cshtml that is located at /Views/Shared folder. In that _Layouts file, locate where menu items are, remove Privacy navigation option and include Todos menu item, like this:
<li class="nav-item">
    <a class="nav-link text-dark" asp-area="" asp-controller="Todos" asp-action="Index">Todos</a>
</li>
Alright, when this is done we can start with Viewmodels
ViewModels in MVC
If you watch your project structure, you can see that theres a folder called ‘Models’ in WebApp project that already includes ‘ErrorViewModel’. It does not matter that much, but I prefer if ViewModels are in corresponding folder. So lets rename ‘Models’ folder to Viewmodels. Lets add a file called ‘TodoViewModel.cs’ over there. To this new file, add following content:
using Domain;
using Microsoft.AspNetCore.Mvc.Rendering;

namespace WebApp.ViewModels
{
    public class TodoViewModel
    {
        public Todo Todo { get; set; } = default!;
        public IEnumerable<SelectListItem> StatusList { get; set; } = default!;
    }
}
So we had the problem that Status was not displaying correctly when we wanted to add new Todo. That selectListItem is presented in 2 views: Add and Edit. So before we get into views, lets change ‘Add’ and ‘Edit’ logic in our TodosController. Lets make it so that those views will return ViewModel element. In TodosController, change Create and Edit like this:
Change Controller
// GET: Todos/Create
public IActionResult Create()
{
    var model = new TodoViewModel
    {
        StatusList = Enum.GetValues(typeof(Status)).Cast<Status>().Select(s => new SelectListItem
        {
            Text = s.ToString(),
            Value = s.ToString()
        }).ToList()
    };
    return View(model);
}

// GET: Todos/Edit/5
public async Task<IActionResult> Edit(Guid? id)
{
    if (id == null)
    {
        return NotFound();
    }

    var todo = await _context.Todos.FindAsync(id);
    if (todo == null)
    {
        return NotFound();
    }
    var viewModel = new TodoViewModel
    {
        Todo = todo,
        StatusList = Enum.GetValues(typeof(Status))
                    .Cast<Status>()
                    .Select(s => new SelectListItem
                    {
                        Text = s.ToString(),
                        Value = s.ToString(),
                        Selected = s == todo.Status
                    })
    };
    return View(viewModel);
}
Change View
So lets go to Create.cshtml file. Over there first thing is to change our model to TodoViewModel. the first line of Create.cshtml to this:
@model WebApp.ViewModels.TodoViewModelSince we changed our model we need to change asp-elements to correspondingly. In all form elements (Title, Description, DueDate, Status), change property from PropertyName to Todo.PropertyName. For example Title elements should be replaced with Todo.Title:
<div class="form-group">
    <label asp-for="Todo.Title" class="control-label"></label>
    <input asp-for="Todo.Title" class="form-control" />
    <span asp-validation-for="Todo.Title" class="text-danger"></span>
</div>
Same thing goes for Description and DueDate elements and for changing Status selection group we can just include asp-items="Model.StatusList" for it to work:
<div class="form-group">
    <label asp-for="Todo.Status" class="control-label"></label>
    <select asp-for="Todo.Status" class="form-control" asp-items="Model.StatusList"></select>
    <span asp-validation-for="Todo.Status" class="text-danger"></span>
</div>
If you did it correctly then Creating new Todo should work. Make sure to modify Edit view same way, code snippet for Edit view is here.
Now lets add some more logic. Lets make it so that DueDate must be future Date in order to create an Todo!
DueDate as future time
To implement this kind of conditional logic we have to do two-way validation. We will do validation in both front-end and in back-end. So for front-end validation, lets use little Javascript
Front-End Date validation
In your Create.cshtml form, we need to include id’s for both to form and to dueDate input value for our Javascript code to work. Put an id of todoForm to our form and an id of DueDate for DueDate input value. Below is the code that has correct id’s and Javascript validation:
<div class="row">
    <div class="col-md-4">
        @* put id here *@
        <form asp-action="Create" id="todoForm">
            @* // ... // *@
             <div class="form-group">
                <label asp-for="Todo.DueDate" class="control-label"></label>
                <input asp-for="Todo.DueDate" class="form-control" id="DueDate" /> @* Id here too *@
                <span asp-validation-for="Todo.DueDate" class="text-danger"></span>
            </div>
            <div class="form-group">
                <input type="submit" value="Create" class="btn btn-primary" />
            </div>
        </form>
    </div>
</div>

<script>
    // our javascript validation script
    document.getElementById("todoForm").addEventListener("submit", function (event) {
        let dueDateInput = document.getElementById("DueDate");
        let dueDateValue = new Date(dueDateInput.value);
        var today = new Date();
        today.setHours(0, 0, 0, 0) // time for midnight for accurate comparison
        if (dueDateValue <= today) {
            event.preventDefault(); // prevent from submission
            alert("Due Date must be future date")
        }
    })
</script>
So this previous code is just as before but 2 id fields and Javascript validation after form. If you got stuck you can compare it with my code here .
Back-end validation
We got Front-end validation done but its not sufficient for modern day validation. With current code you can’t manually submit form, but you could use some other debug platforms like Postman to still post it. So we need to do back-end validation as well to prevent hackers coming in.
navigate to TodosController.cs, find POST method for Create action and add conditional logic inside:
// POST: Todos/Create
[HttpPost]
[ValidateAntiForgeryToken]
public async Task<IActionResult> Create([Bind("Id,Title,Description,DueDate,Status")] Todo todo)
{
    if (ModelState.IsValid)
    {
        if (todo.DueDate < DateTime.Now)
        {
            throw new InvalidOperationException("DueDate cannot be in the past.");
        }
        todo.Id = Guid.NewGuid();
        todo.DueDate = todo.DueDate.ToUniversalTime();
        _context.Add(todo);
        await _context.SaveChangesAsync();
        return RedirectToAction(nameof(Index));
    }
    return View(todo);
}
In this code we also introduced a code snippet todo.DueDate = todo.DueDate.ToUniversalTime(); We need to Convert time to Universal time because Postgres does not allow Current TimeZone to save to database.
Debuging our program
So this is about creating Todos. In this chapter we checked how to include Status to our Create and edit View. Also we did some data validation.
Lets run this program and lets see do we need to do more to get it work
Now when I Run this program I saw errors in HomeController.cs and in _ViewImports.cshtml. We renamed Models folder to ViewModels, so on those files change import folders to ViewModel folder.
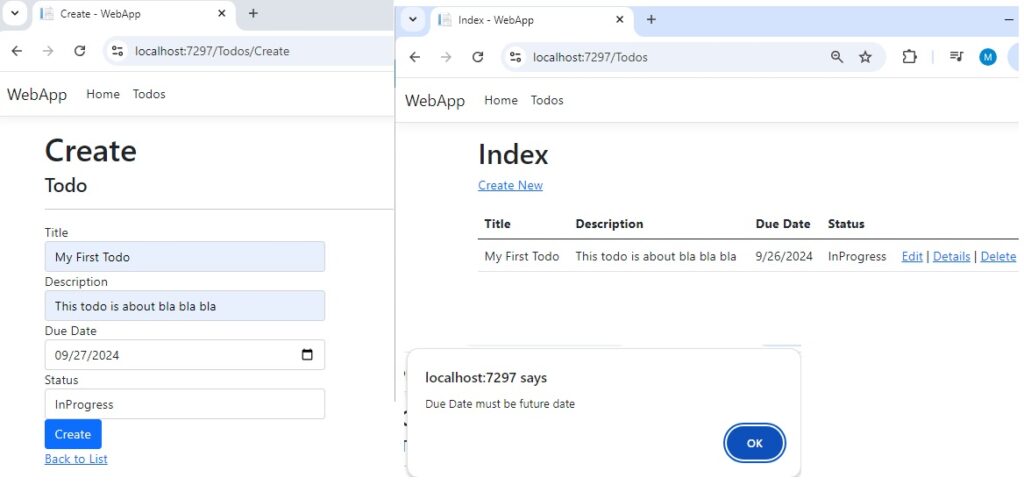
Now the program is working. You can create Todos. They are displayed on main list. If you try to create a Todo with past DueDate then you get alert box. Here are some of my Views:
Now when I tried to Edit Todo I got this kind of Exception:
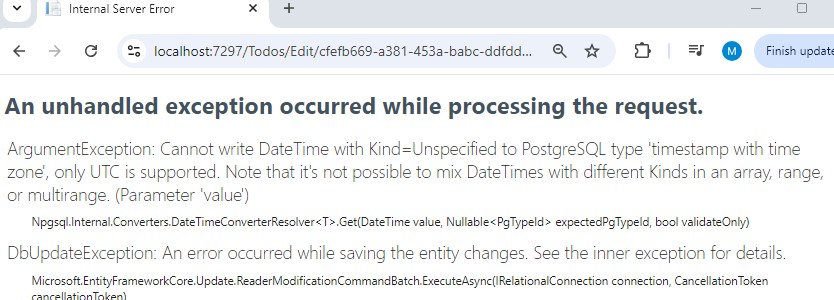
To resolve this issue, make sure to change DueDate to UniversalTimeZone in TodosControllers Edit Post Method. Include this line of code to Edit Post method:
// POST: Todos/Edit/5 TodosController
todo.DueDate = todo.DueDate.ToUniversalTime();
If you included this line then Edit should also work
Alright, now we got our app to work. Lets continue with our path and include Search functionality ![]() ->
->